Exposure:
Step
4.
While
many manuals suggest contact print for about 10mins in bright sunlight,
this can be quite variable. It is actually UV that is exposing the image,
and this can vary considerably from location to location and also is
effected by the seasons.
For
some images exposed to strong mid day sunlight in New Zealand, which
has a high UV level, during mid summer the correct exposure can be as
short as 2minutes.
However
during an overcast day in winter the exposure may be as long as 3 hours.
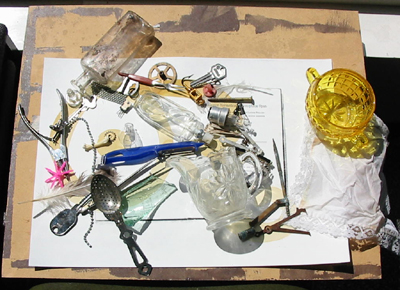 |
Van
Dyke brown exposure for a photogram. Note the light yellow brown
colour of the emulsion at the beginning of the exposure. |
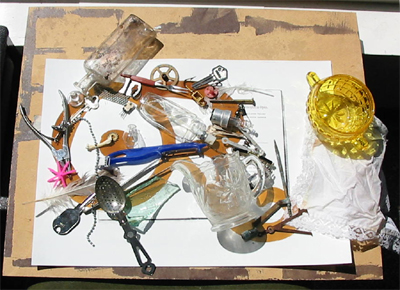 |
Note
the change of emulsion colour with exposure to sunlight. While
the image can be exposed for longer this image is fully exposed.
|
Often
this is done by laying the negative emulsion side down, (or proxy negative
- transparent, acetate, objects for a photogram) onto the emulsion coated
side of the paper. If it is a negative or flat transparency a sheet
of glass about 4 -5 mm thick is placed on top of this to hold everything
in good contact. Special contact printing frames can be made that hold
the paper, negative and glass under pressure. The emulsion is about
twice as fast as the Cyanotype. Correct exposure is indicated when details
are visible in shadows only and mid-tones begin to show faintly.
Additional
Exposure Information:
Usually
the negative is placed on the dry coated paper or base with a piece
of glass on top of this to keep it flat. Variations on this might include:
· Taping the edges of the paper down onto a board will hold it
place for the exposure. The print can also be processed, including drying,
taped down which will make sure the print dries flat. This method is
particularly effective for multiple exposures. Make sure the board has
been sealed with sanding sealer to stop any chemicals migrating from
the board to the paper during processing, or use a plastic sheet. Although
the print might have to be cut from the board when dry, wettable package
tape works well.
A
contact print frame keeps the negative evenly in contact with the paper
during exposure. Hinged wood and glass print frames are available commercially,
or one could be made and are convenient to use. Make sure the glass
is of a reasonable thickness, (4mm- 6mm depending on size) as the weight
will hold the negative in firm contact and also be less prone to breakage.
If
you can get access to one, commercial plate makers and blueprint machines
have rollers or vacuum systems that keep the negative evenly in contact
with the paper. Sunlight, ultraviolet lamp, arc light, commercial plate
maker, sunlamp or other ultraviolet light sources may be used. Exposure
varies depending on lighting, negatives, coating techniques and other
factors. As a starting point, try 10 minutes in bright sun or 75 units
in violet arc light to start. The print will turn yellowish brown or
brown when exposed.
Shorter
exposures result in orangey-brown final prints; longer exposures result
in dark brown prints. Any of these may give the final results you might
want, so experiment and make test prints to find the correct exposure.
Tape
negatives to three dimensional objects coated with emulsion that won't
fit under glass for exposure. After the exposure protect the paper from
stray UV as this will fog the image and process as soon as possible.