 |
Sequence viewing > Index > Photograms
- The ultimate Photogram resource > Resource > ©
Lloyd Godman
Photogram projects by Lloyd Godman - photogram artists
Making
a simple Photogram using the traditional B&W photographic
process
EXPOSING
THE PAPER
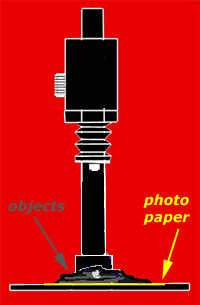
1.
Generally
the photographic paper is laid on a flat base, emulsion
side up with the selected objects placed on it below
an enlarger. If you have never worked with photographic
paper use glossy paper as it is much easier to find
the emulsion side.
Remember
that the paper is sensitive to blue green light and
you need a red or yellow safe light. |
|
2.
The enlarger light is turned on for a predetermined
time to expose the print. When the objects are removed,
there is no visible image on the paper , the image is
there in a latent form only. It is important the photographic
paper is only handled, exposed and processed only in
a safe light. As black and white photographic paper
is sensitive only to the blue/green end of the visual
spectrum, we can have the luxury of watching the image
form at the development stage without 'fogging' the
paper under a yellow or red safe light.
|
|
While
exposing the paper to the correct amount of light is important
to produce specific results, the photogram process has great
tolerance and it is quite easy to make some kind of image with
a wide range of exposures.
As
the fundamentals are the same for the normal black and
white photographic printing process using negatives, the photogram
is a great way to introduce students to photography. No camera,
film development or even an enlarger is necessary, but it is important to remember the following principle, which
is the basis of all black and white processing:
Light
makes silver (the photosensitive particles embedded on the paper)
turn black.
While
exposure to some light might produce an image on the
paper, exposure to not enough light and the paper will
not produce a rich black background. The print will
look look flat and quite gray. To overcome this it might
seem better to give the paper more than enough light
to make sure that it gives a good black in the print,
but when using objects that are semi-transparent, the
correct exposure is more critical to produce just the
right tonal and textural qualities that you might require.
It may take some time, but through a number of experiments
using different exposure times you will be able to work
out the correct exposure on the paper. |
|
Remember
that light makes the paper turn black, and if the print is too
light expose it for a longer time.
Want to learn more? - do a workshop or one on one with Lloyd Godman
|
