|
Want to learn more? - do a workshop or one on one with Lloyd Godman
Processing
for permanence
TWO BATH FIXER: If space permits, it is always preferable to use the
two-bath fixing method as this is far more efficient. To operate a two
bath fixing method, follow this procedure.
1
Mix 2 fresh fixing baths and place them side by side.
2
Fix the prints for 2 min's in the first bath.
3
Fix the prints for 2 min's in second bath.
4
Discard the first bath when 200 8x10 inch prints per gallon of solution
have been fixed.
5
Substitute the second bath for the one just discarded, so this now becomes
the first bath.
-
Mix
a fresh bath, which now becomes the second bath.
- Repeat
this cycle four or five times before discarding both baths and beginning
fresh once again.
TESTING
THE FIXING SOLUTION : There is a very simple test that can be carried
out to test the silver saturation of the fixer and it is a reaction
of potassium iodide to the silver absorbed into the fixer bath. As more
and more prints are fixed the concentration of silver increases in the
fixer. By placing several drops of the Kodak Fixer tester FT 1 in the fix the concentration levels can be determined. If the liquid
stays clear, the fixer is still OK, but if there is a thicker yellow
white stain in the bath from a reaction with the potassium iodide then
the bath is exhausted and should be discarded.
When
working it is wise to check fixer baths regularly, not once a day.
TESTING
FINISHED PRINTS FOR RESIDUAL SILVER : Since the quantity of silver
compounds needed to cause an over all yellow stain on a print or neg
is extremely small, there is no simple quantitative method available.
However, the sort of stain that might be visible after a period of keeping
can be simulated by using the following drop test. Place a drop of Kodak
residual Silver Test Solution ST 1 on an unexposed pat of the material
and blot off with clean white blotting paper.
Any
yellowing of the test spot other than a barely visible cream tint, indicates
the presence of silver. If the test is positive, residual silver can
be removed by refixing and washing. This test should be carried out
before toning because the residual silver has been toned together with
the image. The yellow stain so formed is permanent.
KODAK
RESIDUAL SILVER TEST SOLUTION ST1
Water..................................125ml
Sodium
Sulfide.........................2grams
For
use One part stock solution with 9 parts water. This working solution
has a limited storage life and should be replaced once a week.
Store
stock solution in a capped bottle for not more than 3 months.
Kodak
Rapid Selenium Toner can also be used when diluted 1 to 9. Using this
solution, follow the directions above.
NOTE:
This test fails where a large excess of Hypo is present, as in stabilised
prints.
WASHING
: Even small amounts of Hypo (sodium thiosulfate or ammonium thiosulfate)
remaining in a photographic material after the final wash eventually
combine with the silver of the image to form silver sulfide. The result
of this reaction in black and white negatives or prints is a stained
and faded picture. For most purposes adequate washing is achieved in
an hour in a print washer that change the water completely every hour
like those made by Gravity Works. However, the wash time and rate of
flow are meaningless if the prints are not separated constantly so that
water can reach every part of every print during the wash.
HYPO
CLEARING AGENT : In terms of washing it is interesting to note that
seawater removes hypo from photographic material more quickly than fresh
water. Investigations into this effect have shown that certain inorganic
salts behave like the seawater. Unlike seawater, however they
are harmless to the silver image. Kodak Hypo Clearing agent is a preparation
of such substances. Its use reduces the washing time for both prints
and negatives. When used, it guarantees prints are free from residual
chemicals that is almost impossible to when only washing in water. It
also has the advantage that prints can be washed in much colder water.
Two
Bath Fixer method: Below is a two bath fixer method of processing Fibre
based prints for permanence.
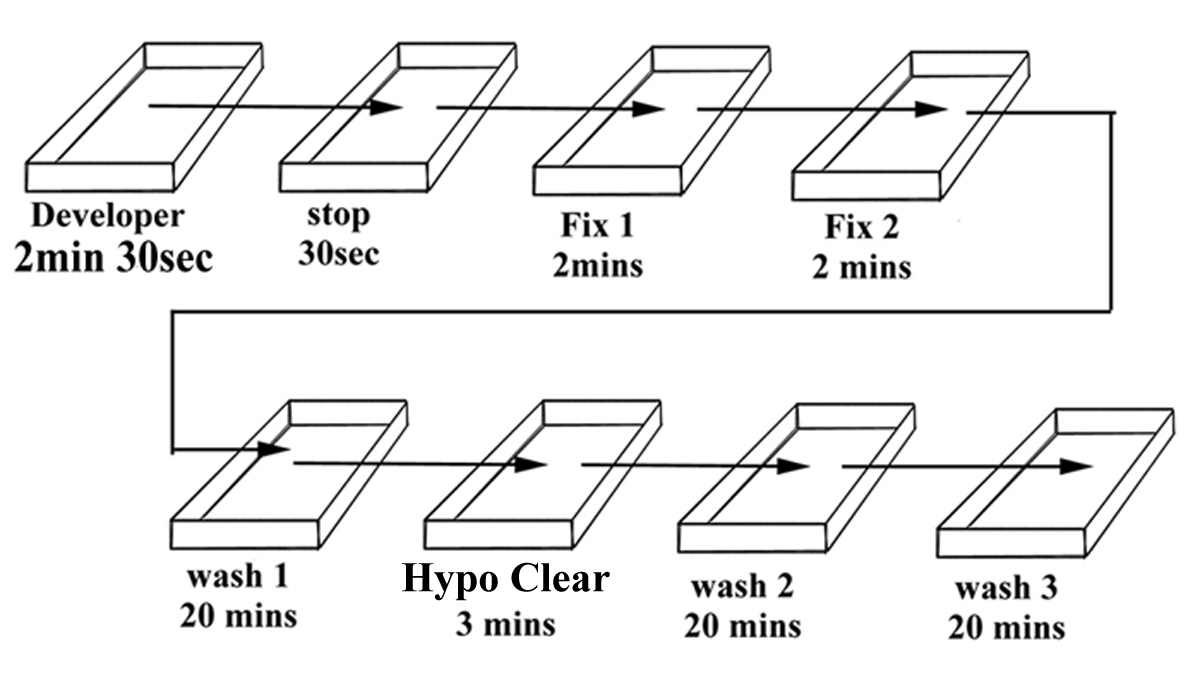
Some
photographers prefer an extended development of up to 3-4 min's to bring
out the fine tones in the high lights and I would suggest experimenting
with this specifically to the work being printed.
HYPO
ELIMINATOR : It is difficult, if not impossible, to remove the last
traces of processing chemicals from photographic papers by ordinary
means and for this reason photographers have often used a Hypo Eliminator.
However it has since been found that while this acts in a beneficial
manner it also has some side effects and is now not recommended.
|